Repotting
|
A Simple Guide to Repotting Container Plants
Trimming the roots and refreshing the soil give potbound plants a
new lease on life
by James D. Kramer
Most healthy container-grown plants eventually outgrow the confines of their pots. A good way to reinvigorate a rootbound plant is to
give it a new home -- also known as repotting. In my former job as a greenhouse manager, I spent a lot of time giving plants new homes.
Recognizing when it's time to repot is the first step. Telltale signs include soil that dries out quickly or has become degraded; roots tightly packed
within a pot or protruding from drainage holes; and water sitting on the soil surface too long after watering. Often a plant simply looks top-heavy or as
if it might burst out of its pot. The best time to repot most plants is when they're actively growing, in the spring or summer. However, plants can
usually handle repotting whenever the situation warrants it. |
 |
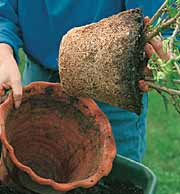
| Roots growing out the drainage hole are a telltale sign of potbound plants. |
|
The second step is to get a plant out of its pot. If a plant is rootbound, it helps to water the root ball thoroughly in advance. For
plants in small to medium pots, invert the pot and support the top of the root ball with one hand. Put your other hand on the bottom of the pot and use a
downward throwing motion with an abrupt stop. Many plants will slip out after one or two throws. If not, knock the edge of the pot against a sturdy
surface, such as a potting bench, still holding the pot with both hands. It may take a few good whacks to release the plant; be careful not to break the
pot.
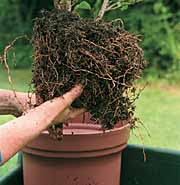
A plant ready for repotting should slide out with the soil in one piece. If much of the soil falls free of the roots, the plant may not need repotting.
If it does, there will likely be a solid soil-and-root mass in the shape of the just-removed pot. Roots should be white or light-colored. Black,
dark-colored, or foul-smelling roots are usually signs of a serious problem, such as fungal disease. |
 |
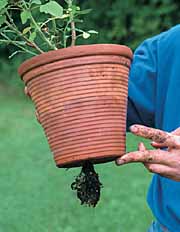
| Often a rootbound plant can be pulled easily from the pot. |
|
| Roots packed tightly in a pot don't take up nutrients efficiently. To promote good nutrient absorption, trim the roots and loosen up
the root ball before replanting. Use a sharp knife or pruning shears for this job, removing as much as the bottom third of the root ball if necessary.
Don't be surprised if what you cut off is a thick tangle of root tissue. Also make three or four vertical cuts about a third of the way up the remaining
root ball. |
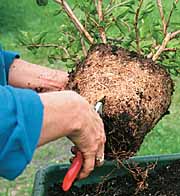 |
| Trim off the bottom of the root ball and make some vertical cuts up the sides. |
|
| Cut through any roots growing in a circular pattern to help prevent the plant from strangling itself with its own roots as it grows.
If the roots are thick along the sides of the root ball, shave or peel away the outer layer. Or gently untangle the root ball with your fingers as if you
were mussing someone's hair. Do this along the top edge of the root ball, too.
The proper size of the new pot depends on the plant and its potential growth rate, how well it's growing under current conditions, and the ultimate size
desired for the plant. Rely on your own idea of what a healthy specimen of a particular species should look like. When in doubt, go with a pot the next
size up. |
 |
| Gently untangle the remaining roots somewhat. |
|
| To keep soil from leaking out the bottom of the pot, cover its drainage hole(s) with a paper towel, coffee filter, mesh screen, or
pot shard. If you use a pot shard, place it convex side up to avoid sealing the hole. While it's common practice to put gravel or charcoal in the bottom
of pots, they don't help with drainage and take up valuable space, so I don't recommend using them. |
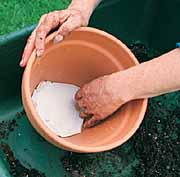 |
| A paper coffee filter keeps soil from leaking out the bottom. |
|
| To repot a small plant that's easy to lift, put a few inches of moist soil in the pot and tamp it down lightly. Place the plant in
the pot, centering it. The goal is to get the top of the root ball to sit about an inch below the rim of the pot. If the plant is in too deep, gently
raise it and add more soil. If it sits too high, remove the plant and dig out some soil, or just dump the soil out and start over. |
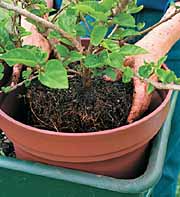 |
| Choose a pot slightly bigger than the root ball. |
|
| Now, fill the space around the root ball with soil. I've noticed that there are two approaches to this job -- "stuffing" and
"filling." Stuffers like to press soil in around a plant. Fillers like to fill the pot to the brim and let the soil settle in during the first few
waterings. I'm usually a filler, but I do stuff a bit at times, especially with top-heavy plants that need to be steadied. Whether you stuff or fill,
leave some room at the top so the pot can hold enough water with each watering to thoroughly moisten the soil.
Finally, trim the plant's foliage relative to how much the roots were pruned. In other words, if you removed a third of the roots, prune off a third of
the top growth as well. Water the plant thoroughly and keep it moist, shaded, cool, and perhaps misted until it is reestablished. |
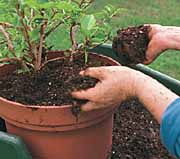 |
| Fill in with fresh potting soil, and trim the top of the plant. |
|
James D. Kramer works for TrueLeaf Technologies, a designer of greenhouse systems.
Photos: Jodie Delohery
 |
|


|
|